
A floor can look straightforward until the first section comes up and shows you what is really underneath. Old glue, cracked screed, tile bedding that will not let go, moisture issues, uneven slabs – this is where the floor stripping process either stays on track or starts causing delays. If the goal is a clean, ready-for-renovation site, the removal work has to be done properly from the start.
For homeowners and builders alike, floor stripping is not just about getting rid of old materials. It is about exposing the substrate without creating avoidable damage, keeping dust and disruption under control, and leaving the area ready for the next trade. That takes the right equipment, a clear method, and enough experience to adjust when the floor does not behave as expected.
What the floor stripping process actually involves
The floor stripping process is the full removal of an existing floor finish and any residue that stops the next installation from going ahead. Depending on the site, that may mean lifting tiles, timber, vinyl, carpet, cork, slate, marble or epoxy coatings. It often also includes removing adhesives, tile bedding, levelling compounds, waterproofing remnants or paint contamination.
This matters because the visible floor covering is only one part of the job. In many renovations, the real work starts after the finish is gone. If adhesive is left behind, if the slab is scarred, or if high spots remain across the floor, the next installer has to work around a problem that should have been solved earlier.
A proper strip does three things. It removes the old surface completely, protects the substrate where possible, and leaves the area in a condition that is suitable for follow-on trades. That final point is where specialist removal work earns its keep.
Step 1: Site inspection and planning
Every good result starts with knowing what you are dealing with. Before any machine starts, the site needs to be checked for floor type, substrate condition, access, waste removal, dust management and any obvious risks. A bonded tile floor over concrete behaves very differently from glued vinyl over timber sheeting, and both require a different approach again from an epoxy-coated commercial slab.
This first stage also sets expectations. Some floors come up cleanly. Others fight all the way. Older properties can hide multiple layers of coverings, patch repairs, brittle screeds or heavy adhesive build-up. On commercial sites, access windows, noise restrictions and occupancy can shape the entire job.
The point of planning is simple – choose the right removal method before the floor chooses one for you.
Step 2: Preparing the work area
Preparation is what keeps a removal job controlled instead of chaotic. Furniture, fittings and loose obstacles need to be cleared. Adjacent areas should be protected. In occupied homes and businesses, isolation of the work zone matters because dust and debris can travel quickly if the site is not properly contained.
Power supply, equipment access and waste handling also need to be organised early. On jobs with tighter turnaround times, that preparation can make the difference between finishing the same day and carrying avoidable delays into the next stage.
Safety sits here as well. Floor stripping is heavy, noisy work with sharp debris, airborne dust and machine hazards. The right PPE, safe operating procedures and a disciplined setup are not optional extras.
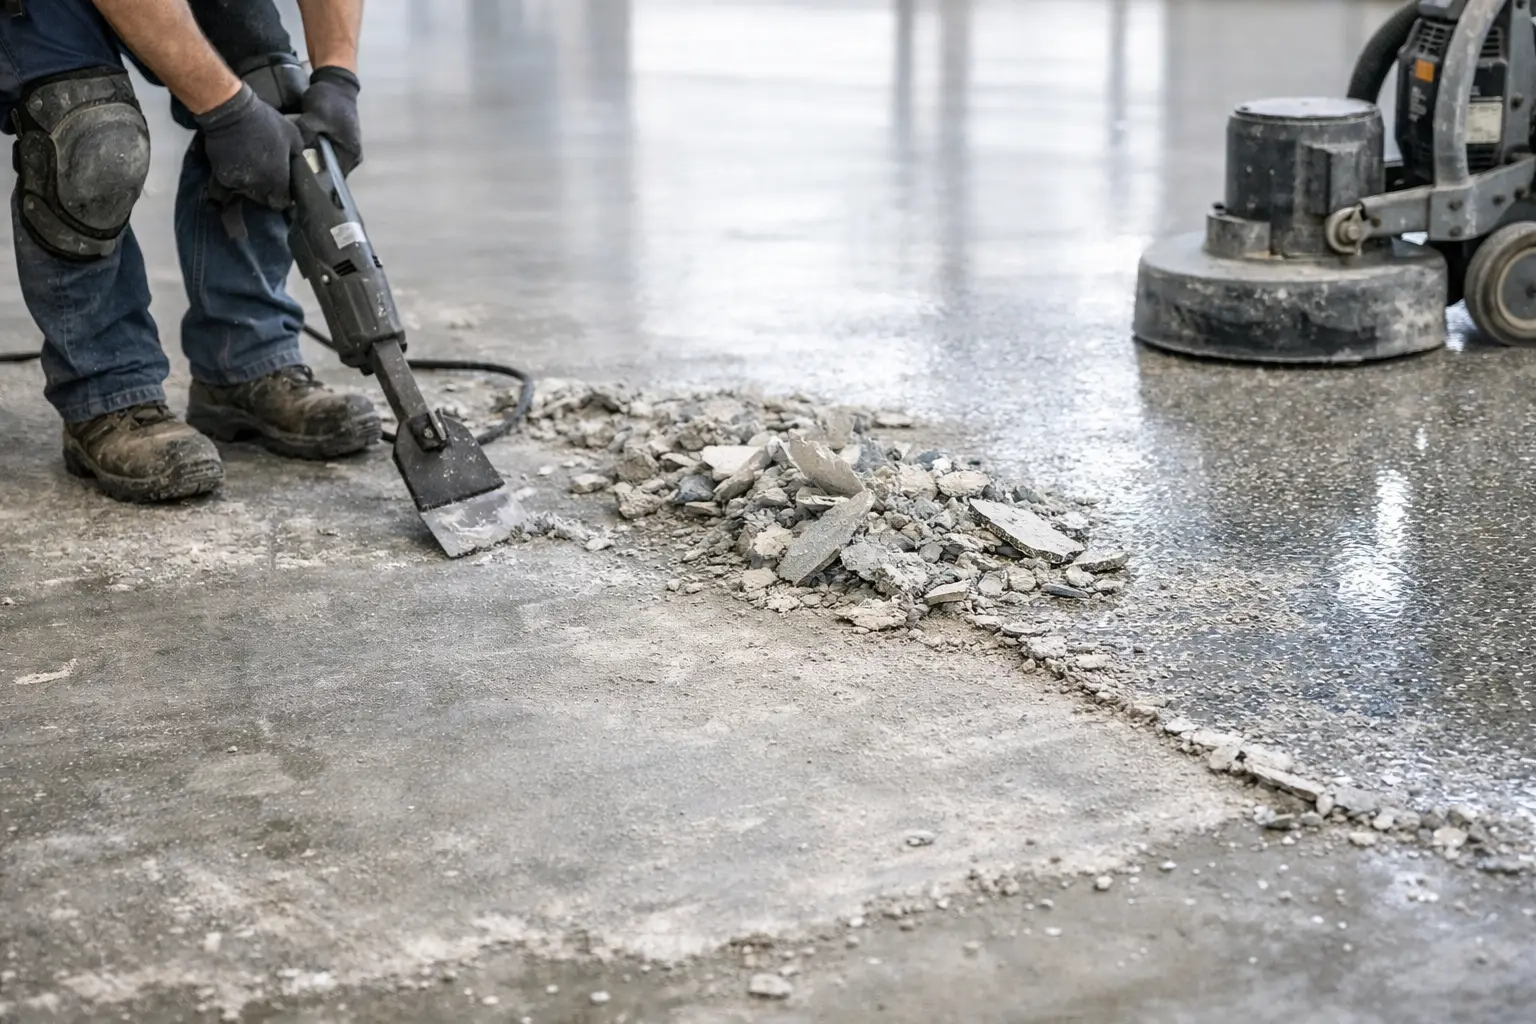
Step 3: Removing the floor covering
This is the stage most people picture, but it is only one part of the overall process. The method depends entirely on the material and what it is fixed to.
Tiles and stone often require mechanical breakers and dedicated stripping equipment to lift both the tile and its bedding. Timber may need to be prised up in sections or mechanically removed if heavily bonded. Vinyl and cork can peel cleanly on some jobs and tear into stubborn fragments on others. Carpet usually comes up faster, but the underlay and adhesive can still create extra work.
Epoxy and painted surfaces are different again. These are rarely peeled away neatly. They usually need grinding or abrasion to remove the coating and expose a suitable surface beneath.
This is where experience matters. Push too hard with the wrong machine and you can gouge the slab. Go too lightly and the job drags out while residue stays behind. A specialist team adjusts pressure, tooling and technique as the site reveals itself.
Different floors, different challenges
Not all removals are hard for the same reason. Ceramic and porcelain tile can be physically demanding because of the bond strength and bedding. Timber can be time-consuming when adhesives have cured hard across the full floor. Vinyl may seem simple until old glue smears across the slab and refuses to release. Natural stone can be thick, brittle and inconsistent.
Even within the same property, one room may strip cleanly while the next has patchwork repairs, moisture damage or poor previous installation work. That is why blanket assumptions rarely help. The floor tells you what it needs once the removal starts.
Step 4: Adhesive and residue removal
If this stage is skipped or rushed, the next trade pays for it. Adhesives, levelling compounds, paint overspray and thin remnants of old floor systems can all interfere with new installation. Some products will not bond properly over contamination. Others will telegraph flaws through the finished surface.
Residue removal often calls for grinders, scrapers or specialty tools depending on the material. The aim is not to make the slab look pretty for its own sake. The aim is to produce a clean, sound substrate that is ready for re-levelling, waterproofing or new floor coverings.
This is also where dust control becomes critical. Grinding without proper dust extraction turns a floor prep job into a site-wide clean-up problem. On occupied premises, that is not just inconvenient. It can shut down surrounding areas and frustrate everyone involved.
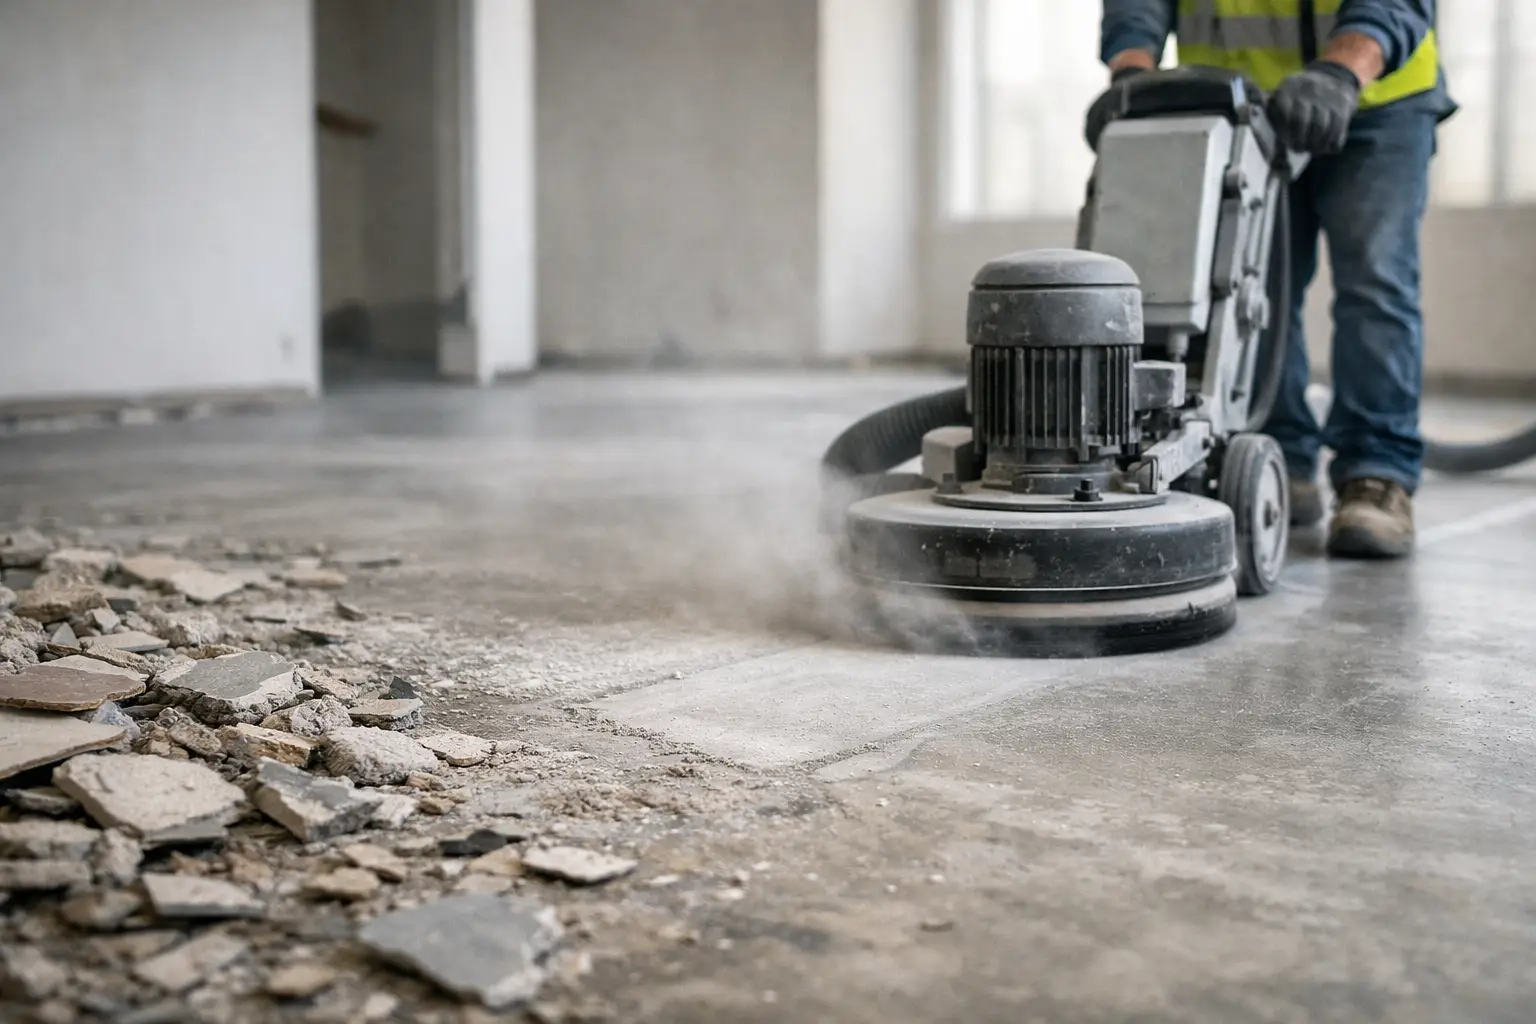
Step 5: Substrate assessment and slab grinding
Once the old floor and residue are gone, the substrate can finally be assessed properly. This is the point where hidden defects become visible – cracks, drummy patches, moisture staining, old repairs, uneven sections and surface contamination that was not obvious before.
In many jobs, slab grinding is the step that brings the floor into line for what happens next. Grinding can remove remaining high spots, smooth rough areas, open the surface for coatings or adhesives, and create a more consistent base for levelling products.
There is no one-size-fits-all finish here. A slab prepared for polished concrete is different from one prepared for tile, hybrid flooring or commercial vinyl. The required finish depends on the next system being installed. Good prep work takes that into account rather than treating every floor the same.
Why the floor stripping process goes wrong
Most failures happen for one of three reasons. The wrong equipment is used, the substrate is not respected, or the job is treated as simple labour when it actually needs technical judgement.
DIY attempts often run into trouble because people underestimate the bond strength of old materials or overestimate how much a general-purpose tool can do. On the other side, rushed contractors may remove the visible floor but leave behind contamination, low spots or edge damage that causes problems later.
There is also the issue of timing. If the removal crew is slow, the whole renovation sequence gets pushed back. Tilers, waterproofers, installers and painters cannot work properly on a floor that is half-stripped or poorly prepared. Fast work is valuable, but only if it still leaves the site right.
When speed matters most
Some projects can absorb a bit of disruption. Others cannot. Retail, hospitality, offices, unit renovations and family homes under active renovation usually need a tighter turnaround. In these environments, the floor stripping process has to be efficient, clean and well-managed because every extra day affects access, scheduling and handover.
That is where specialist operators stand apart from general demolition crews. A proper floor removal team knows how to sequence the job, control debris, keep machinery productive and leave the site ready for the next stage. Rapid Stripped works in exactly this space – fast, technically sound removal and surface prep for clients who need the job done properly without unnecessary hold-ups.
Choosing the right contractor for floor stripping
The right question is not just, can they remove the floor? It is, can they remove it cleanly, manage the mess, protect the slab where possible and leave the site ready for what comes next?
Look for a contractor who understands different floor types, uses purpose-built equipment, takes dust control seriously and talks clearly about substrate condition. The best operators will also be upfront about variables. Some jobs finish cleanly and quickly. Others reveal more once the floor is lifted. Honest advice at the start usually means fewer surprises in the middle.
For projects across Northern NSW, the Gold Coast, Brisbane and the Sunshine Coast, local experience can help as well. Access conditions, building types and renovation timeframes vary, and practical knowledge counts when the schedule is tight.
A floor should never be the reason a renovation stalls. Get the stripping process right, and the rest of the job has a solid place to start.