


If a new floor fails early, the problem usually starts underneath it. Subfloor preparation for new flooring is what decides whether your finish sits flat, bonds properly and lasts, or starts sounding hollow, lifting at the edges or showing every defect in the slab below.
That matters whether you are laying timber in a home, vinyl in a tenancy, tiles in a bathroom renovation or a hard-wearing finish in a commercial fit-out. The visible floor gets the attention, but the subfloor carries the load. If it is dirty, uneven, damp or still covered in old adhesive, you are building on a problem.
Why subfloor preparation for new flooring matters
A floor covering is only as good as the surface under it. Adhesives need a clean and stable base. Floating systems still need level support. Tiles need a solid substrate with the right tolerances. Even small ridges, weak spots or contamination can telegraph through and become expensive defects later.
This is where many renovation timelines go off track. Old coverings come up, and what is underneath is worse than expected – tile bedding stuck hard to the slab, black adhesive residue, paint overspray, cracked screed, moisture issues or years of patch repairs that never should have stayed. If that substrate is not corrected before installation, the next trade inherits the problem.
Good preparation is not overkill. It is what gets the site genuinely ready.
What a subfloor needs before a new floor goes down
The exact standard depends on the flooring type, but the basics stay the same. The subfloor must be clean, dry, sound and level enough for the product being installed.
Clean means more than a quick sweep. Dust, adhesive, paint, grease, curing compounds and loose material can all interfere with bonding. Dry means moisture is within the flooring manufacturer’s limits, not just that the slab looks dry on the day. Sound means the substrate is stable, with no drummy sections, loose toppings or crumbling areas. Level means within tolerance for the new floor, because some products are far less forgiving than others.
A polished concrete finish, glue-down vinyl and large-format tiles all have different demands. That is why preparation is never one-size-fits-all.
Common subfloor problems after floor removal
Once old flooring is stripped, the real condition of the subfloor becomes clear. In homes and commercial sites alike, a few issues show up again and again.
Adhesive residue is one of the biggest. Old vinyl, carpet, cork and timber can leave heavy glue behind, and some of it is stubborn enough that basic scraping will not get the slab ready. The same goes for tile bedding and mortar left after tile removal. If high spots remain, the new floor will not sit correctly.
Uneven slabs are another major issue. Some are out of level from the original pour. Others have patches from previous renovations, cracks, feathered repairs or rough transitions between rooms. A floor might have looked acceptable with thick carpet on top, then become obviously unsuitable when a thinner finish is selected.
Moisture is the issue people often miss. A slab can feel fine underfoot and still hold enough moisture to affect adhesives or sensitive flooring products. In ground-floor areas, wet zones and older buildings, this needs proper attention before installation begins.
The right approach depends on the substrate
Concrete subfloors are common, but they vary a lot. Some need adhesive removal and grinding. Others need crack repairs, levelling compound or moisture treatment. A hard, dense slab may need mechanical preparation to create the right profile for bonding.
Timber subfloors bring different concerns. You are looking for movement, squeaks, bounce, water damage and sheet joints that may print through under the finished floor. A timber substrate might need refastening, replacement sections or underlay adjustments before it is ready.
Then there are mixed substrates, which are common in renovations. You might have old tile areas meeting timber, patched concrete next to original slab, or a bathroom threshold built up higher than the surrounding rooms. Those transitions need to be corrected properly, not hidden and hoped for.
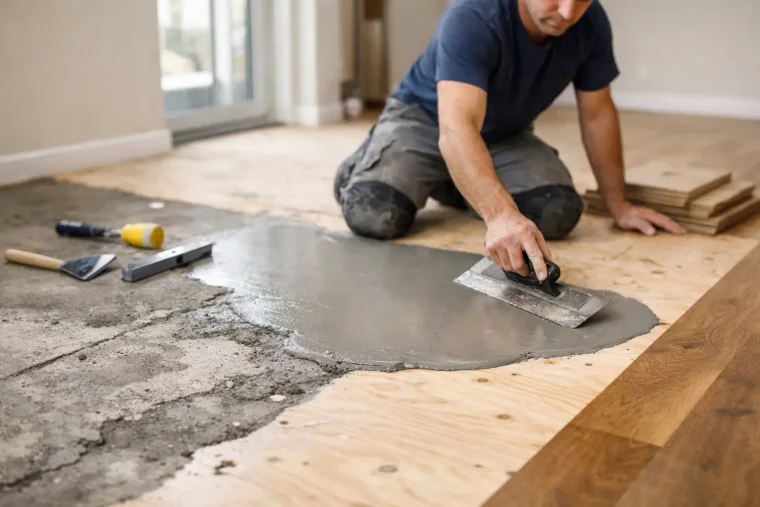
How subfloor preparation for new flooring is usually carried out
The process starts with a proper assessment. Before any new floor is ordered or booked for installation, the substrate should be checked for contamination, moisture, flatness and structural condition. This avoids finding major problems halfway through the job.
Next comes removal of anything that should not be there. That may include floor coverings, tile bedding, adhesives, coatings, paint or loose patching materials. This stage is where specialist equipment often makes the difference between a drawn-out mess and a clean, controlled result. On tougher jobs, slab grinding is the only practical way to get back to a sound surface.
After that, repairs and corrections can begin. Cracks may need treatment depending on whether they are active or cosmetic. Low spots may need levelling compound. High spots may need further grinding. Weak or drummy sections have to be removed and remade, not skimmed over.
The final step is making sure the surface matches the requirements of the new flooring system. That includes the right flatness, the right surface profile and the right moisture condition. If one of those is off, the job is not ready.
Where DIY preparation often comes unstuck
There is a difference between pulling up a floor and preparing a subfloor for reinstallation. Plenty of people can remove a few planks or tiles. The hard part is getting the surface underneath properly ready without damaging the substrate or leaving defects that show up later.
Grinding too lightly can leave adhesive contamination behind. Grinding too aggressively can gouge the slab. Patch repairs done without proper prep can fail. Dust control is another big one. Fine dust moves through a property fast, especially during renovations in occupied homes, offices and retail spaces.
Timing also matters. If preparation drags out, the whole renovation sequence starts to slip. That is why builders, investors and property managers usually want a team that can strip, prepare and hand over a site ready for the next trade without unnecessary downtime.
Different floors, different tolerances
Not every new floor asks the same thing from the subfloor. Tiles can tolerate some variation, but large-format tiles demand much tighter flatness than many people expect. Vinyl and hybrid flooring tend to show imperfections quickly, especially under certain light. Timber can react badly to moisture or movement in the substrate. Carpet is more forgiving visually, but a poor base can still affect wear and feel underfoot.
This is where experience saves rework. If the prep standard is based on guesswork instead of the actual flooring system, the installer ends up compensating for a surface that never should have been passed.
Clean execution matters as much as technical prep
Floor preparation is noisy, physical and messy by nature, but it should still be controlled. Good site prep protects adjacent areas, manages dust, clears waste efficiently and keeps the job moving. That matters even more in occupied homes, strata properties, office suites, hospitality venues and retail tenancies where disruption has a cost.
A clean handover is not just about appearances. It helps the next trade start on time and reduces the chance of contamination or confusion once installation begins. For that reason, specialist operators are often brought in for difficult removals and substrate preparation rather than leaving it to general labour.
When to bring in a specialist
If the old floor is bonded hard to the substrate, if there is thick adhesive build-up, if the slab is uneven, or if you are working to a tight renovation timeline, specialist preparation is usually the smarter move. The same applies to commercial sites where speed, safety and dust control are non-negotiable.
This type of work rewards the right equipment and the right judgement. A team experienced in difficult floor removal and slab preparation can usually identify the fastest path to a site-ready result, whether that means grinding, stripping, levelling or targeted demolition. For clients across Northern NSW, the Gold Coast, Brisbane and the Sunshine Coast, that often means less delay between removal and reinstallation.
Rapid Stripped works in exactly that gap between old floor removal and a substrate that is genuinely ready for the next stage.
Before the new flooring arrives
The best time to think about the subfloor is before the installation date is locked in, not after the old material comes up. If you want the new finish to perform, start by treating the substrate like the foundation it is.
A floor can only look as good as what sits underneath it. Get the slab or subfloor clean, sound, level and dry first, and everything that follows runs better. That is the kind of preparation that saves time, avoids defects and gives the new floor a fair chance to last.