


A new floor is only as good as what sits underneath it. If you get the slab wrong, the finish on top can fail early – tiles can crack, vinyl can telegraph defects, timber can shift, and coatings can peel. That is why knowing how to prepare concrete subfloor properly matters before any new flooring goes down.
This is not a job to rush with a broom and a bag of levelling compound. Good preparation means identifying what is on the slab now, what condition the concrete is in, and what the next floor covering actually needs. The right method depends on whether you are dealing with old adhesive, paint, tile bedding, moisture, cracks, or an uneven surface.
How to prepare concrete subfloor before new flooring
The first step is to look past the surface dirt and work out exactly what you are starting with. A concrete subfloor might appear solid, but still have hidden issues that will affect bond strength and finish quality. Old vinyl glue, paint overspray, curing compounds, floor leveller, waterproofing residue, and thin-set or tile bedding all need different treatment.
If you are renovating an older home or commercial site, expect variation across the slab. One room may be reasonably clean while the next has stubborn adhesive, patchy repairs, or areas of weak concrete. This is where many jobs come unstuck. People prepare one section properly, then assume the rest only needs a quick tidy-up.
A proper inspection should check for contamination, surface hardness, flatness, cracking, hollows, moisture issues, and leftover floor coverings. You also need to know the flooring system going back on top. Preparation for glue-down vinyl is not the same as preparation for large-format tiles or epoxy.
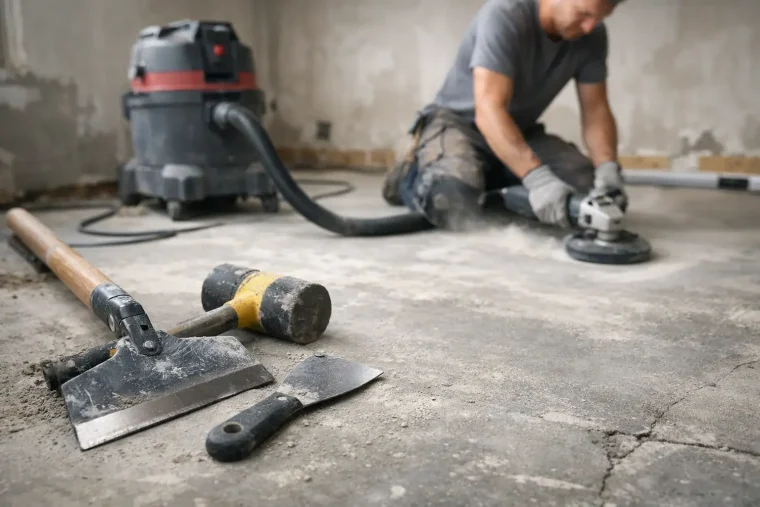
Remove all floor coverings and residue completely
This sounds obvious, but partial removal is one of the biggest causes of flooring problems. If old adhesive, backing, tile bedding, paint, or levelling compound is left behind in patches, the new system is only bonding to a weak layer. That weak layer can break down long before the concrete does.
For soft coverings such as carpet, vinyl, cork, or timber, the visible material usually comes up first and the real work starts after. Adhesive residue can be thick, brittle, rubbery, or deeply soaked into the slab. Some can be scraped, but a lot of it needs mechanical removal to get back to clean, sound concrete.
For tiled floors, removal often leaves behind bedding mortar, ridges, and low spots. These need to be ground back or mechanically removed so the slab is even and ready for repair. Simply knocking off the high points and filling the rest rarely gives a reliable result.
Paints and coatings are another common issue. If the slab has been sealed or coated in the past, it may resist primers and adhesives unless the surface is opened up properly. In those cases, grinding is usually the right approach because it removes contamination and creates a profile suitable for the next product.
Clean is not enough – the slab must be sound
A lot of people confuse a clean slab with a ready slab. They are not the same thing. A floor can look free of dust and still be too weak, too smooth, too damp, or too uneven for a successful install.
Once coverings and residue are gone, check whether the concrete itself is solid. If the surface is chalky, flaky, soft, or delaminating, any new adhesive or coating is sitting on compromised material. Weak laitance and brittle skim layers need to be removed. In many cases that means grinding the slab back to a firmer surface.
Cracks also need proper attention. Hairline cracking may be stable and manageable, but moving cracks or structural cracks are different. Filling everything blindly with patch compound is not a fix. The repair method depends on whether the crack is active, how wide it is, and what finish floor is going down.
Hollows should not be ignored either. If parts of the slab sound drummy or loose, they need investigation before resurfacing starts. Covering over unstable concrete is just delaying a failure.
Check flatness and level separately
Flat and level are not the same thing, and the difference matters. A slab can be level across the room but still have humps and dips that affect the finished floor. It can also be flat enough for tile and still unsuitable for vinyl planks, which show every ripple underneath.
Use a straight edge to identify high spots, birdbaths, and trowel marks. Large-format tiles need a flatter substrate than smaller tiles. Vinyl and hybrid flooring can be even less forgiving because imperfections telegraph through the surface or affect the click system.
High spots usually need grinding. Low spots may need patching or self-levelling compound, but only after the slab has been properly prepared for the product being used. Leveller is not a shortcut for poor prep. If the slab is dusty or contaminated, the leveller can fail with it.
Moisture can undo the whole job
If there is one issue that keeps causing avoidable failures, it is moisture. A concrete slab can look dry on the surface and still hold enough moisture to affect adhesives, coatings, timber products, or levelling compounds. Bubbling, debonding, mould risk, and cupping can all start here.
This is especially relevant for ground-floor slabs, older properties, and spaces that have had leaks, poor drainage, or long periods closed up. A basic visual check is not enough where moisture-sensitive floor finishes are planned. The slab needs to be assessed against the requirements of the product going on top.
What happens next depends on the result. Sometimes the floor can proceed after drying time and proper priming. In other cases, a moisture barrier or a different flooring system may be needed. The point is to catch it before installation, not after the floor starts lifting.
Mechanical preparation usually gives the best result
When people ask how to prepare concrete subfloor properly, the answer often comes back to mechanical preparation. Scraping, acid washing, and general cleaning have their place in limited situations, but they do not reliably remove heavy residue or create a consistent surface profile.
Grinding is often the most effective method because it removes adhesives, paint, thin coatings, weak surface layers, and minor high spots in one process. It also leaves the slab more uniform and ready for repairs, primers, or direct installation depending on the specification.
The exact tooling matters. Soft adhesive residue, thick tile glue, hard-set bedding, and brittle coatings all behave differently under machinery. Using the wrong diamonds or trying to force a machine through the wrong substrate can waste time and leave the floor uneven. This is where specialist preparation crews earn their keep – they know when to grind, when to scarify, and when a slab needs heavier removal.
Dust control matters as well. Concrete grinding without proper extraction creates a mess, slows the job, and affects every other trade on site. On occupied homes, shops, offices, and renovation projects with tight timelines, controlled preparation makes a real difference.
Repair the slab for the floor you are installing
After removal and grinding, the slab should be repaired to suit the final finish. That means using compatible patching products and making sure repairs are fully cured and bonded before the next stage begins.
Small chips, minor cracking, pinholes, and low areas can often be patched. Broader irregularities may need a smoothing compound or self-leveller. The key is matching the repair to the floor covering. A warehouse coating might tolerate minor variation that sheet vinyl will not. Timber may need moisture management that tiles do not.
It also pays to think about transitions and door heights at this stage. If you build up one room too much with leveller, you can create headaches at thresholds, skirtings, and adjoining floor finishes.
Know when DIY prep stops making sense
There are simple jobs where basic cleaning and minor patching are enough. But once you are dealing with stubborn adhesive, tile bedding, coatings, uneven slabs, moisture risk, or a large area, prep becomes a trade job. The risk is not just extra labour. It is installing an expensive floor over a substrate that was never ready.
For homeowners and renovators, the tipping point is usually time, equipment, and confidence in the result. For builders and commercial managers, it is usually programme pressure and the cost of getting it wrong. A specialist team can strip, grind, and prepare the slab properly so the next trade is not walking into preventable delays.
That is the real goal with subfloor preparation – not just getting the old floor out, but handing over a slab that is clean, sound, flat enough, and ready for what comes next. If the base is right, everything after it runs smoother.